Storage setting
Storage
Storage is certainly something you’re going to need. Stateless applications/containers are fun and all, but in the end, if you want to do something useful, you need to store some data. Even if that data is as simple as a configuration file.
Seriously, how is Amazon or Google handling persistent storage on their Kubernetes clusters? Maybe they just use external SAN, like 3Par, and present LUNs to each node… how then do they deal with multiple containers trying to write to the same file? I have some many questions about this.
Options
- Rook + Ceph – This one you can possibly get to work, but with unofficial arm64 builds thanks to https://github.com/raspbernetes/multi-arch-images. I believe this is stable on normal servers, and even production ready, but did not survive two reboots of my K8s cluster on Raspberry Pi 4. Combining that with the heavy load and not steep but vertical learning curve of Ceph, I would not recommend this for a Raspberry home cluster.
- Longhorn – Another native Kubernetes storage, now finally with support for arm64 out of the box! https://github.com/longhorn/longhorn/issues/6 I ended up with this one as the only viable solution.
- GlusterFS + Heketi – GlusterFS works fine on Raspberry Pi, I tested it… Heketi is dead though, so not really native support. However, we can use GlusterFS to mount a folder on each node, and tell Kubernetes to use local FS as storage. This would make the data available on every node, and in case the pod switches to another, the persistent data will be there, waiting for it. A slight issue with GlusterFS though: It’s not recommended for “live” files, a.k.a. databases, which sux… But, to be honest, I have seen MySQL running on a GlusterFS cluster in production 😀.
- NFS – Funnily enough, this one works just fine. You can create claims and manage it from Kubernetes (My first cluster was using NFS as persistent storage, and it worked fine). However, this is not clustered, and this single point of failure turns it against the exercise we are trying to do here.
Longhorn
Fairly new Kubernetes native file-system for arm64, at the time of writing, but man it just worked! After the ordeal with Rook + Ceph, it was such a breeze to set it up! My cluster is in a 5-week stability testing phase now, and nothing has broken.
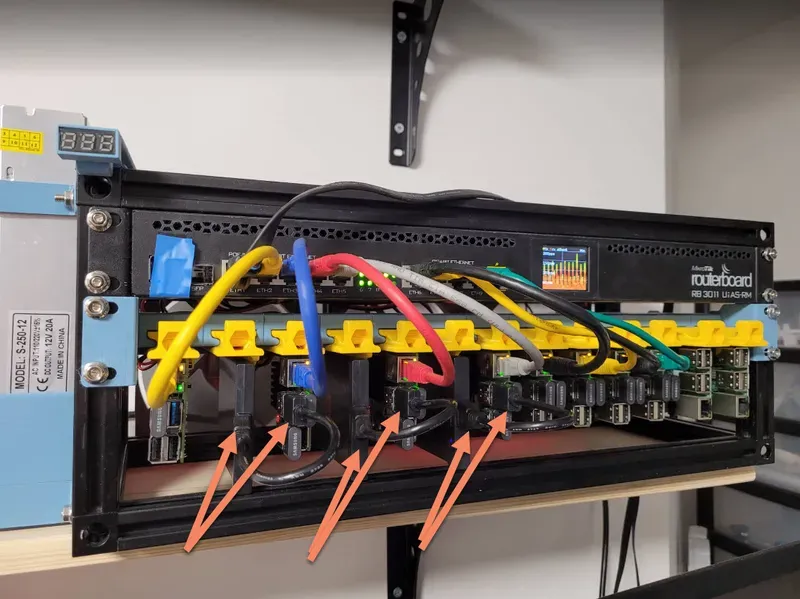
As you know from our node setup, I want to use a separate USB flash-drive 64 GB on each worker node to be a volume for storage. Longhorn is making this simple for us. All you need to do is mount the disk under /var/lib/longhorn, which is a default data path. I forgot to do that beforehand, and had to change it later, it’s super simple, so no worries. I ended up with my storage under /storage01.
/var/lib/longhorn if you are not using another disk or usb disk. I just changed it to /storage01 since this is easy to find. And when adding another disks, I'll add them under /storage02,03,04...There is an issue with Raspberry Pi: the names for disks are assigned almost at random. Therefore, even if you have USB disks in the same slots on multiple nodes, they can be named at random, /dev/sda or /dev/sdb, and there is no easy way to enforce the naming, without messing with udev rules a lot.
Software requirements
Install following software, from master node run:
ansible cube -b -m apt -a "name=nfs-common state=present"
ansible cube -b -m apt -a "name=open-iscsi state=present"
ansible cube -b -m apt -a "name=util-linux state=present"
Identifying disks for storage
We are going to use Ansible again a lot, and will add new variables with disk names that will be used for storage into /etc/ansible/hosts.
We are going to use the lsblk -f command on every node and look for disk labels:
root@control01:~/longhorn# ansible cube -b -m shell -a "lsblk -f"
control01 | CHANGED | rc=0 >>
NAME   FSTYPE FSVER LABEL UUID                                 FSAVAIL FSUSE% MOUNTPOINT
sda
├─sda1 vfat   FAT32       AE5D-8FB0                              94.5M    25% /boot
└─sda2 ext4   1.0         a83708ef-afc9-486f-85b2-8e3bad22c439   25.8G     8% /
sdb
└─sdb1 exfat  1.0         9901-8574
cube03 | CHANGED | rc=0 >>
NAME   FSTYPE FSVER LABEL UUID                                 FSAVAIL FSUSE% MOUNTPOINT
sda
├─sda1 vfat   FAT32       AE5D-8FB0                              94.5M    25% /boot
└─sda2 ext4   1.0         a83708ef-afc9-486f-85b2-8e3bad22c439   25.4G     9% /
sdb
└─sdb1 exfat  1.0   DBAN  4A57-C184
cube04 | CHANGED | rc=0 >>
NAME   FSTYPE FSVER LABEL UUID                                 FSAVAIL FSUSE% MOUNTPOINT
sda
├─sda1 vfat   FAT32       AE5D-8FB0                              94.5M    25% /boot
└─sda2 ext4   1.0         a83708ef-afc9-486f-85b2-8e3bad22c439   25.5G     9% /
sdb
└─sdb1 exfat  1.0         127C-735A
cube02 | CHANGED | rc=0 >>
NAME   FSTYPE FSVER LABEL UUID                                 FSAVAIL FSUSE% MOUNTPOINT
sda
├─sda1 vfat   FAT32       AE5D-8FB0                              94.5M    25% /boot
└─sda2 ext4   1.0         a83708ef-afc9-486f-85b2-8e3bad22c439   25.5G     9% /
sdb
└─sdb1 exfat  1.0         391C-98E6
cube01 | CHANGED | rc=0 >>
NAME   FSTYPE FSVER LABEL UUID                                 FSAVAIL FSUSE% MOUNTPOINT
sda
├─sda1 vfat   FAT32       AE5D-8FB0                              94.5M    25% /boot
└─sda2 ext4   1.0         a83708ef-afc9-486f-85b2-8e3bad22c439   25.4G     9% /
sdb
└─sdb1 exfat  1.0         D5D8-9B9D
cube05 | CHANGED | rc=0 >>
NAME   FSTYPE FSVER LABEL UUID                                 FSAVAIL FSUSE% MOUNTPOINT
sda
├─sda1 vfat   FAT32       AE5D-8FB0                              94.5M    25% /boot
└─sda2 ext4   1.0         a83708ef-afc9-486f-85b2-8e3bad22c439   25.5G     9% /
sdb
└─sdb1 exfat  1.0         592D-A74B
cube06 | CHANGED | rc=0 >>
NAME   FSTYPE FSVER LABEL UUID                                 FSAVAIL FSUSE% MOUNTPOINT
sda
├─sda1 vfat   FAT32       AE5D-8FB0                              94.5M    25% /boot
└─sda2 ext4   1.0         a83708ef-afc9-486f-85b2-8e3bad22c439   53.6G     4% /
sdb
└─sdb1 exfat  1.0         DDB5-F165
cube07 | CHANGED | rc=0 >>
NAME   FSTYPE FSVER LABEL UUID                                 FSAVAIL FSUSE% MOUNTPOINT
sda
├─sda1 vfat   FAT32       AE5D-8FB0                              94.5M    25% /boot
└─sda2 ext4   1.0         a83708ef-afc9-486f-85b2-8e3bad22c439   53.7G     4% /
sdb
└─sdb1 exfat  1.0         A3C2-A106
As you can see, each node has two disks, sda and sdb, but assigned at boot. Every disk that splits to <name>1 and <name>2, and has /boot and / as mount points, these are our OS disks. The other one is our “storage” 🙂. Not all my disks are wiped though, so let’s take care of that. You can see disks with: sdb1 exfat 1.0 Samsung USB 64A5-F009 which is the default FAT partition for a USB disk for windows, and your USB might be formatted to that from factory…
Edit /etc/ansible/hosts, and add a new variable (I have chosen name var_disk) with the disk to wipe. TAKE YOUR TIME AND LOOK TWICE ! the wipefs command we’re gonna use will not wipe your OS disk, but it might wipe any other that is not mounted.
[control]
control01  ansible_connection=local var_hostname=control01

[workers]
cube01  ansible_connection=ssh  var_hostname=cube01 var_disk=sdb
cube02  ansible_connection=ssh  var_hostname=cube02 var_disk=sdb
cube03  ansible_connection=ssh  var_hostname=cube03 var_disk=sdb
cube04  ansible_connection=ssh  var_hostname=cube04 var_disk=sdb
cube05  ansible_connection=ssh  var_hostname=cube05 var_disk=sdb
cube06  ansible_connection=ssh  var_hostname=cube06 var_disk=sdb
cube07  ansible_connection=ssh  var_hostname=cube07 var_disk=sdb

[cube:children]
control
workers
Wipe
Wipe them! Wipe them all with wipefs -a, it’s the only way to be sure!
#wipe
ansible workers -b -m shell -a "wipefs -a /dev/{{ var_disk }}"
#format to ext4
ansible workers -b -m filesystem -a "fstype=ext4 dev=/dev/{{ var_disk }}"
Above will clear the partition table, and format the disk to ext4.
File system and mount
We need to get unique identification number of our storage disks so we can mount them every time, even if the /dev/... label changes for them. For that, we need the UUID of the disks.
root@control01:~/longhorn# ansible workers -b -m shell -a "blkid -s UUID -o value /dev/{{ var_disk }}"
cube03 | CHANGED | rc=0 >>
4f92985d-5d8f-4429-ab2c-b10c650a5d0b
cube05 | CHANGED | rc=0 >>
c70ed2cd-c239-4cf5-a2eb-2233e478d8d6
cube04 | CHANGED | rc=0 >>
b114d056-c935-4410-b490-02a3302b38d2
cube01 | CHANGED | rc=0 >>
f1f2c384-4619-4a93-be82-42bbfee0269c
cube02 | CHANGED | rc=0 >>
5002bfe6-dcd1-4814-85ab-54b9c0fe710e
cube07 | CHANGED | rc=0 >>
71158db2-0a98-48ff-b46f-5910e5fd6945
cube06 | CHANGED | rc=0 >>
85fdc626-a01d-438f-b96f-088caf89f0cb
Add these to /etc/ansible/hosts, with another custom variable, for example:
[control]
control01  ansible_connection=local var_hostname=control01

[workers]
cube01  ansible_connection=ssh  var_hostname=cube01 var_disk=sdb var_uuid=f1f2c384-4619-4a93-be82-42bbfee0269c
cube02  ansible_connection=ssh  var_hostname=cube02 var_disk=sdb var_uuid=5002bfe6-dcd1-4814-85ab-54b9c0fe710e
cube03  ansible_connection=ssh  var_hostname=cube03 var_disk=sdb var_uuid=4f92985d-5d8f-4429-ab2c-b10c650a5d0b
cube04  ansible_connection=ssh  var_hostname=cube04 var_disk=sdb var_uuid=b114d056-c935-4410-b490-02a3302b38d2
cube05  ansible_connection=ssh  var_hostname=cube05 var_disk=sdb var_uuid=c70ed2cd-c239-4cf5-a2eb-2233e478d8d6
cube06  ansible_connection=ssh  var_hostname=cube06 var_disk=sdb var_uuid=85fdc626-a01d-438f-b96f-088caf89f0cb
cube07  ansible_connection=ssh  var_hostname=cube07 var_disk=sdb var_uuid=71158db2-0a98-48ff-b46f-5910e5fd6945

[cube:children]
control
workers
Using Ansible and module mount, we can mount the disks to /storage01
ansible workers -m ansible.posix.mount -a "path=/storage01 src=UUID={{ var_uuid }} fstype=ext4 state=mounted" -bInstall Longhorn
Gone is cumbersome installing of Longhorn, we can simply use helm to install it.
# On the control node
cd
helm repo add longhorn https://charts.longhorn.io
helm repo update
helm install longhorn longhorn/longhorn --namespace longhorn-system --create-namespace --set defaultSettings.defaultDataPath="/storage01"
# if you do not want to create separate service file for UI access as I did leter on with `service.yaml` you can use it like this:
helm install longhorn longhorn/longhorn --namespace longhorn-system --create-namespace --set defaultSettings.defaultDataPath="/storage01" --set service.ui.loadBalancerIP="192.168.0.201" --set service.ui.type="LoadBalancer"- --set defaultSettings.defaultDataPath is optional, you can remove/edit the disks later on from UI.
Give it some time. It should deploy, maybe some pods will restart, but in the end, it should look something like this.
Everything under namespace longhorn-system should be 1/1 Running or 2/2 Running.
root@control01:~# kubectl -n longhorn-system get pod
NAME                                        READY   STATUS    RESTARTS      AGE
longhorn-ui-5f7f496999-4gln9                1/1     Running   0             16m
longhorn-manager-l77jt                      1/1     Running   0             16m
longhorn-manager-tzjjj                      1/1     Running   1 (12m ago)   16m
longhorn-driver-deployer-76698c6bfd-cnp7k   1/1     Running   0             16m
longhorn-manager-7nkpq                      1/1     Running   0             16m
longhorn-manager-mhlbw                      1/1     Running   0             16m
longhorn-manager-zsgqx                      1/1     Running   0             16m
longhorn-manager-q2xfb                      1/1     Running   0             16m
longhorn-manager-qq924                      1/1     Running   0             16m
longhorn-csi-plugin-t89lc                   2/2     Running   0             11m
longhorn-csi-plugin-7d9v7                   2/2     Running   0             11m
longhorn-csi-plugin-6s797                   2/2     Running   0             11m
longhorn-csi-plugin-bcjzq                   2/2     Running   0             11m
longhorn-csi-plugin-r5rqf                   2/2     Running   0             11m
longhorn-csi-plugin-mpwl2                   2/2     Running   0             11m
longhorn-csi-plugin-pd7dn                   2/2     Running   0             11m
csi-provisioner-869bdc4b79-bvkgf            1/1     Running   0             11m
csi-attacher-6454556647-7k6rs               1/1     Running   0             11m
csi-resizer-6d8cf5f99f-qgmk4                1/1     Running   0             11m
csi-resizer-6d8cf5f99f-7gzgc                1/1     Running   0             11m
csi-snapshotter-588457fcdf-4x4gz            1/1     Running   0             11m
csi-provisioner-869bdc4b79-lxgpt            1/1     Running   0             11m
csi-snapshotter-588457fcdf-fw9g7            1/1     Running   0             11m
csi-attacher-6454556647-kxf5z               1/1     Running   0             11m
csi-snapshotter-588457fcdf-gnfhz            1/1     Running   0             11m
csi-provisioner-869bdc4b79-4slgp            1/1     Running   0             11m
csi-attacher-6454556647-q97vx               1/1     Running   0             11m
csi-resizer-6d8cf5f99f-8j62q                1/1     Running   0             11m
engine-image-ei-4dbdb778-jvfpb              1/1     Running   0             12m
instance-manager-r-29d3635e                 1/1     Running   0             12m
instance-manager-e-2c714582                 1/1     Running   0             12m
engine-image-ei-4dbdb778-t2gjw              1/1     Running   0             12m
instance-manager-e-b4f89992                 1/1     Running   0             12m
instance-manager-r-d4a07a82                 1/1     Running   0             12m
instance-manager-r-04cef88a                 1/1     Running   0             12m
instance-manager-e-5c8ac33e                 1/1     Running   0             12m
instance-manager-e-86f75e23                 1/1     Running   0             12m
instance-manager-r-2ac107c1                 1/1     Running   0             12m
engine-image-ei-4dbdb778-kmrlm              1/1     Running   0             12m
engine-image-ei-4dbdb778-4pspf              1/1     Running   0             12m
engine-image-ei-4dbdb778-qbxwv              1/1     Running   0             12m
instance-manager-r-aa3ce791                 1/1     Running   0             12m
instance-manager-e-d8039cfb                 1/1     Running   0             12m
instance-manager-e-e4dee072                 1/1     Running   0             12m
instance-manager-r-632b7b6b                 1/1     Running   0             12m
instance-manager-r-c87d9b84                 1/1     Running   0             12m
instance-manager-e-59e98d09                 1/1     Running   0             12m
engine-image-ei-4dbdb778-bcb28              1/1     Running   0             12m
engine-image-ei-4dbdb778-shlrt 1/1 Running 1 12mCrashLooBackOff you need to uninstall Longhorn with helm uninstall longhorn and then reinstall it with the same command but add --version 1.2.4 to the end of the command.Look also at services. Longhorn-frontend is a management UI for storage, similar to what Rook + Ceph have. Very useful!
Later on, we will assign it its own LoadBalancer IP.
root@control01:~# kubectl -n longhorn-system get svc
NAME                       TYPE           CLUSTER-IP      EXTERNAL-IP     PORT(S)        AGE
longhorn-replica-manager   ClusterIP      None            <none>          <none>         15d
longhorn-engine-manager    ClusterIP      None            <none>          <none>         15d
longhorn-frontend          ClusterIP      10.43.111.132   <none>          80/TCP         15d
longhorn-backend           ClusterIP      10.43.122.67    <none>          9500/TCP       15d
csi-attacher               ClusterIP      10.43.9.106     <none>          12345/TCP      15d
csi-provisioner            ClusterIP      10.43.107.135   <none>          12345/TCP      15d
csi-resizer                ClusterIP      10.43.175.174   <none>          12345/TCP      15d
csi-snapshotter            ClusterIP      10.43.180.130   <none>          12345/TCP      15d
UI
We can setup external IP for the UI from the range we setup in metallb.
Create file service.yaml with the following contents:
apiVersion: v1
kind: Service
metadata:
  name: longhorn-ingress-lb
  namespace: longhorn-system
spec:
  selector:
    app: longhorn-ui
  type: LoadBalancer
  loadBalancerIP: 192.168.0.201
  ports:
    - name: http
      protocol: TCP
      port: 80
      targetPort: http
I have chosen IP address 192.168.0.201 for the UI. Next apply and check it out.
root@control01:~/longhorn# kubectl apply -f service.yaml

root@control01:~# kubectl get svc --all-namespaces | grep longhorn-ingress-lb
longhorn-system   longhorn-ingress-lb        LoadBalancer   10.43.238.251   192.168.0.201   80:30405/TCP
If all went well, you should see the following going to that IP with browser:
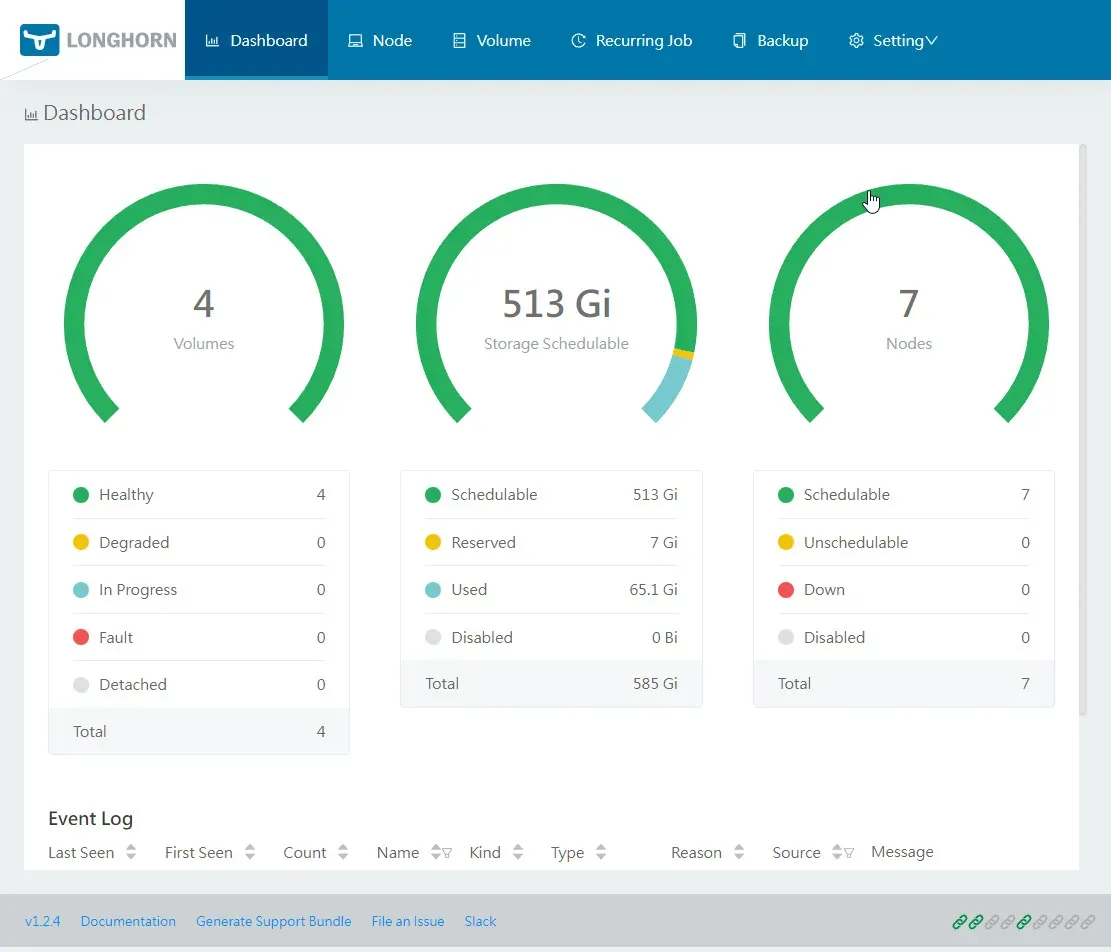
Above is from my already used system. So there are some disks created.
Add /storage01
We need to add our mounted storage as a disk for Longhorn. Navigate to Node via the web UI. You need to do this for each node. Click on Operation -> Edit node and disks:
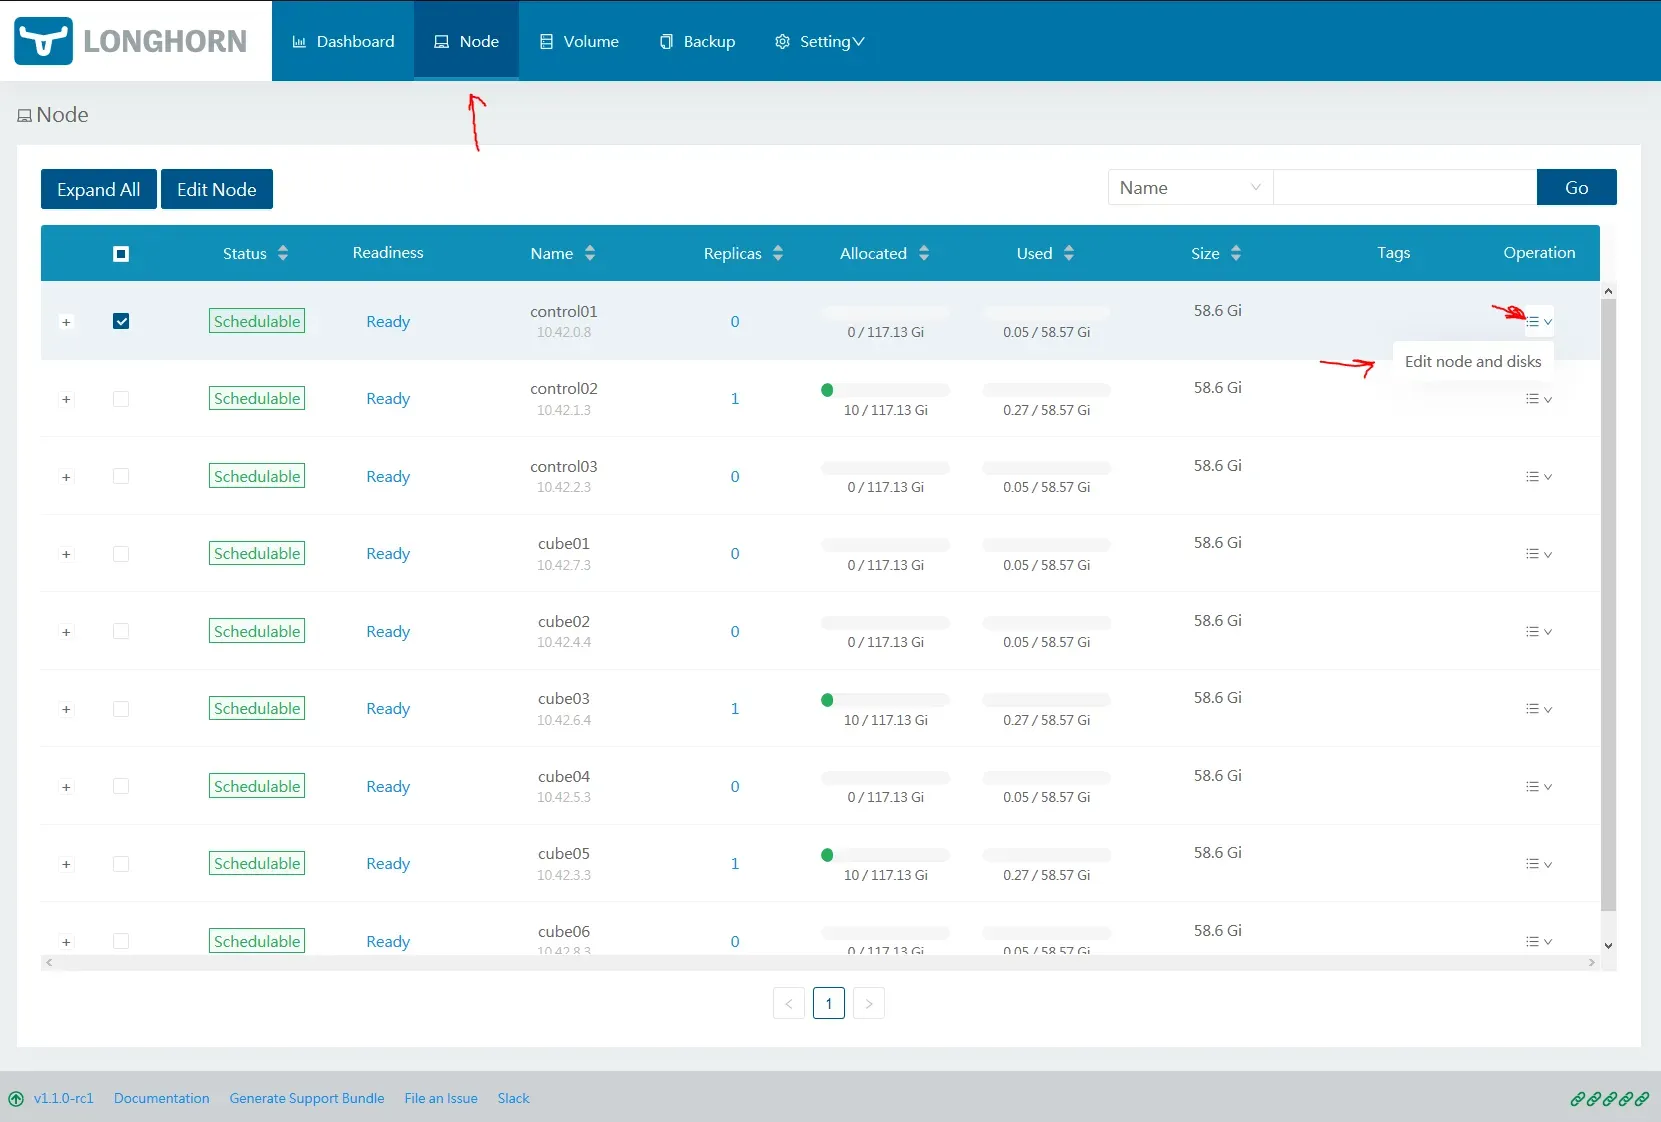
You will already have a node populated with default storage /var/lib/longhorn, and some random name.
First, click on Add Disk, and fill in a new disk location, making sure you switch Scheduling to Enable.
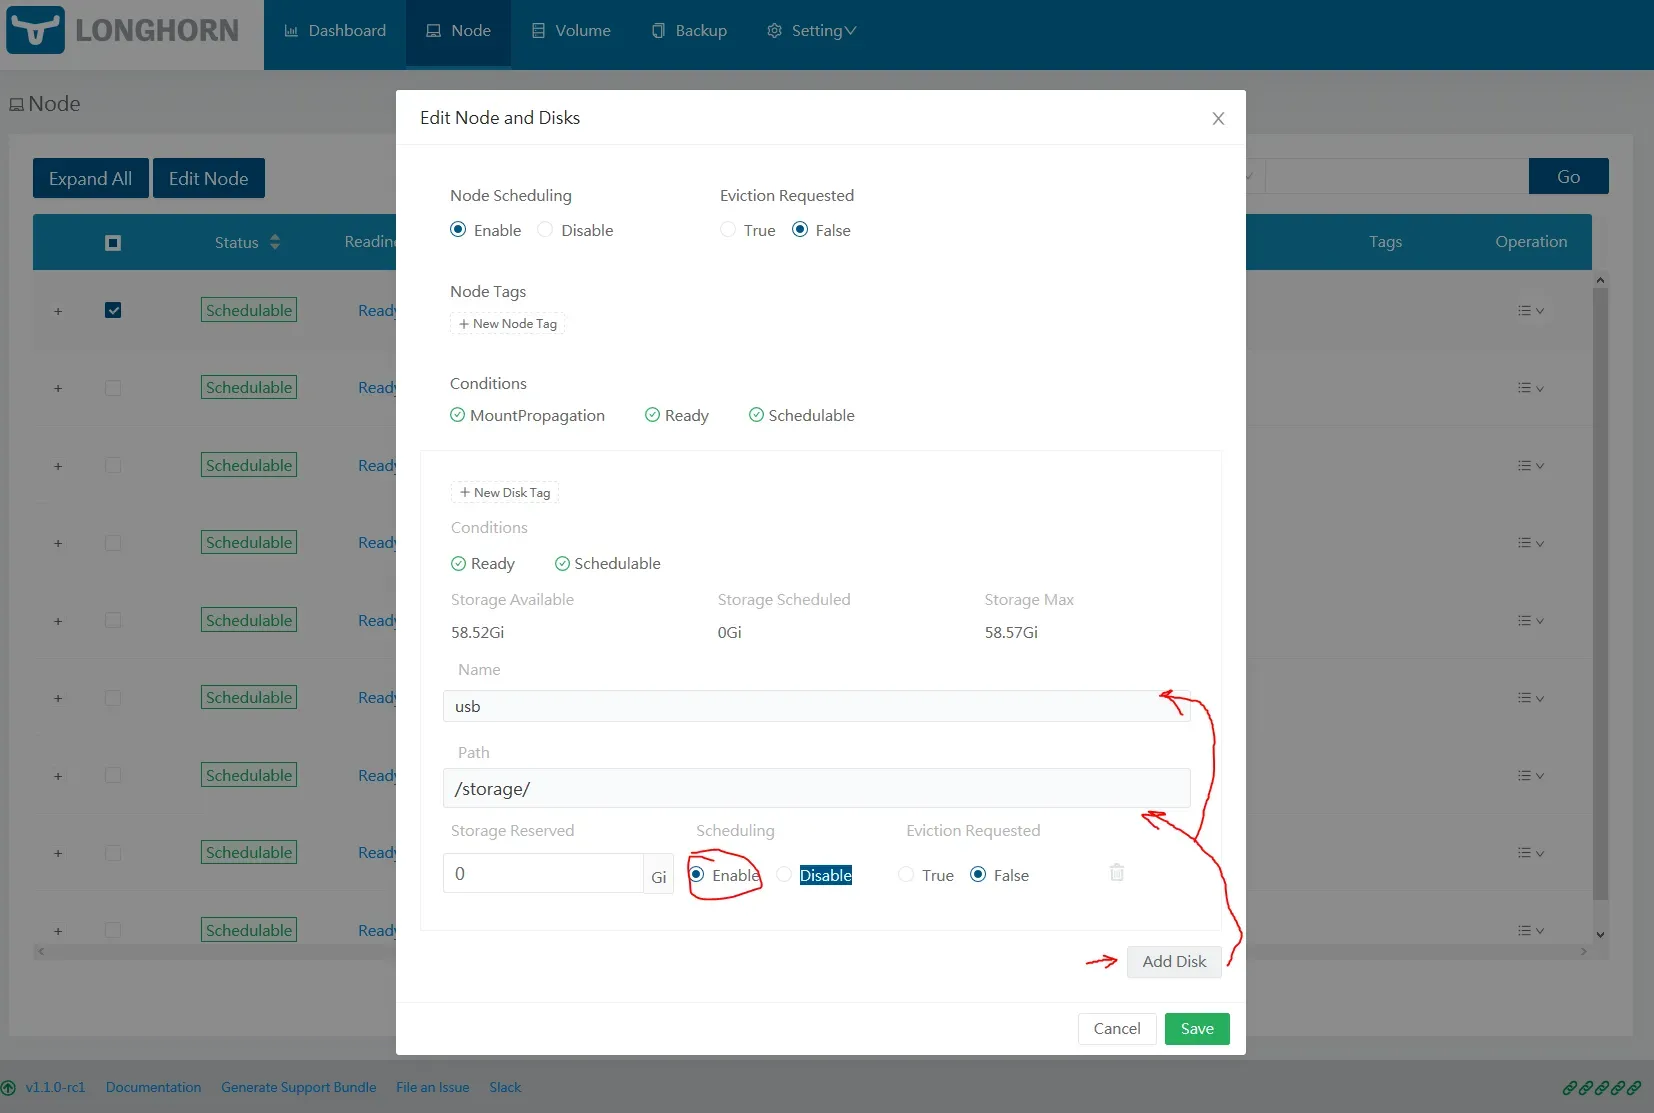
Second, on the disk with path /var/lib/longhorn, switch Scheduling to Disable. Then, click on the trash can to remove it.
Do the same for each node.
Make Longhorn the default StorageClass
Almost done! I'd like to make Longhorn the default storage provider, and this should already be the case if you followed my guide from start, so that when using Helm (which already has a pre-set chart to use default storage provider) it will choose Longhorn.
By default, it would look like this after fresh k3s install.
oot@control01:/home/ubuntu# kubectl get storageclass
NAME                 PROVISIONER             RECLAIMPOLICY   VOLUMEBINDINGMODE      ALLOWVOLUMEEXPANSION   AGE
local-path (default)          rancher.io/local-path   Delete          WaitForFirstConsumer   false                  6d1h
longhorn (default)   driver.longhorn.io      Delete          Immediate              true                   6d1h
Execute:
kubectl patch storageclass local-path -p '{"metadata": {"annotations":{"storageclass.kubernetes.io/is-default-class":"false"}}}'Result:
root@control01:/home/ubuntu# kubectl get storageclass
NAME                 PROVISIONER             RECLAIMPOLICY   VOLUMEBINDINGMODE      ALLOWVOLUMEEXPANSION   AGE
local-path          rancher.io/local-path   Delete          WaitForFirstConsumer   false                  6d1h
longhorn (default)   driver.longhorn.io      Delete          Immediate              true                   6d1h
Now, Longhorn is the default storage class.
There are also reports down in comments that the local-path storage class is coming back after a reboot. I have not tested this, but the solution seems to be edit /var/lib/rancher/k3s/server/manifests/local-storage.yaml and look for the storageclass.kubernetes.io/is-default-class: "true" section in the StorageClass definition and comment it out. Do this on all master nodes. (Thanks rendragnet)
That’s all for now. I'll get into how to create PV and PVC for deployments when we are going to install a docker-registry.
Adding SSD Tier
Later, I have decided to add 3x SSD to the cluster. Why 3, well, by default Longhorn create 3 replicas for each storage you request. I wanted more space for apps, and something more durable than USB disks. On the hardware side, I used one SSD per node. Cube01, Cube02, and Cube03 received SSD.
I logged to each node and checked with dmesg what is the disk name. You can do the same reliably also with fdisk -l. Not gonna lie, I bought the cheapest SSD in size of 512 GB I could get the next day. This is how it looks like in fdisk -l.
Disk /dev/sda: 476.94 GiB, 512110190592 bytes, 1000215216 sectors
Disk model: S350 512GB
Units: sectors of 1 * 512 = 512 bytes
Sector size (logical/physical): 512 bytes / 4096 bytes
I/O size (minimum/optimal): 4096 bytes / 4096 bytes
Next I did the same we did with the USB disks with Ansible, just manually.
#wiped the disk just in case
wipefs -a /dev/sda
#added ext4 filesystem
mkfs.ext4 /dev/sda
#Got UUID
blkid -s UUID -o value /dev/sda #returned 7cf3fc21-74d6-4c01-a835-f8bd36bc3f7b
# created mount point
mkdir /storage02
# added line to /etc/fstab
echo "UUID=7cf3fc21-74d6-4c01-a835-f8bd36bc3f7b /storage02 ext4 defaults 0 0" >> /etc/fstab
# mounted the disk
mount -a
Adding the disks in Longhorn UI
The most simple way is to go to Longhorn UI and click on Node and then click on Operation -> Edit node and disks. Click Add Disk and fill in the new disk location, making sure you switch Scheduling to Enable. Do not forget to tag it as SSD. (Choose whatever you want, but I used SSD
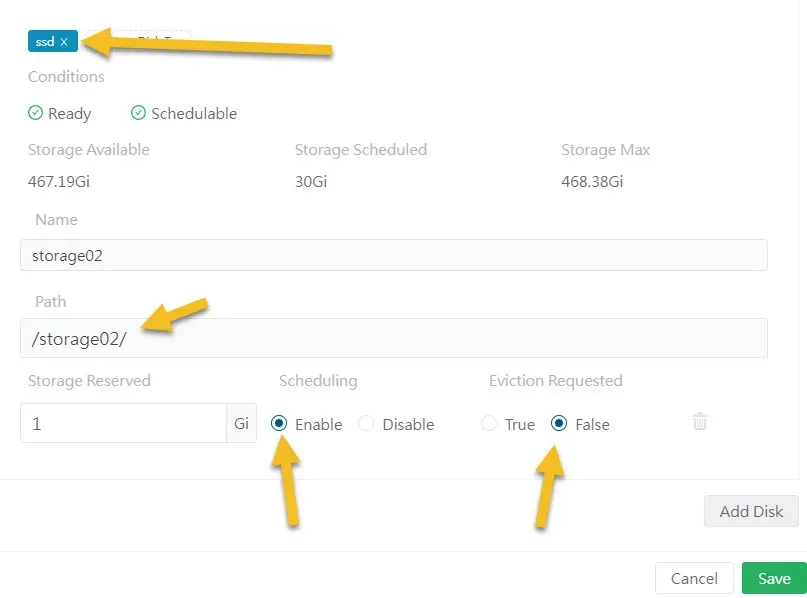
On top of the same edit page, look for Node Tags and add SSD.
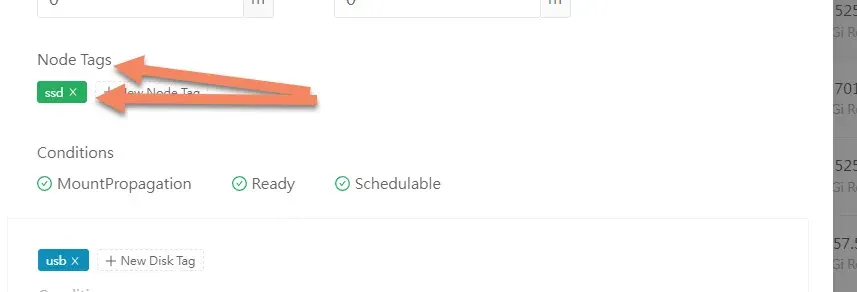
Do the same for all 3 nodes.
This will make the new SSD disks available in Longhorn UI. But we need to somehow target this new storage when creating new disks in Kubernetes.
New StorageClass
We are going to add new storage class, specific for SSD. Default storage class will be the USB disks and this one called longhorn-fast will be using the SSDs.
Create a new file longhorn-fast.yaml on your control node (or in Git if you're using Argo CD ).
---
kind: StorageClass
apiVersion: storage.k8s.io/v1
metadata:
  name: longhorn-fast
provisioner: driver.longhorn.io
allowVolumeExpansion: true
reclaimPolicy: "Delete"
volumeBindingMode: Immediate
parameters:
  numberOfReplicas: "3"
  staleReplicaTimeout: "30"
  fsType: "ext4"
  diskSelector: "ssd"
  nodeSelector: "ssd"
This you can now reference as storage class when creating disks, or in helm charts, and the PV/PVC will be created on the SSD storage we added. This is of course just my setup, but this way you could create tiers of storage in your clusters. For fast SSD storage, slow HDD that needs more space than speed, network attached storage, etc.
Sample PVC
I created a test PVC definition to check if everything works.
---
apiVersion: v1
kind: PersistentVolumeClaim
metadata:
  name: test-pvc
  namespace: default
spec:
  accessModes:
    - ReadWriteOnce
  storageClassName: longhorn-fast
  resources:
    requests:
      storage: 5Gi
Apply and check if it created ok.
root@control01:~# kubectl apply -f test.yaml
persistentvolumeclaim/test-pvc created
root@control01:~# kubectl get pvc
NAME       STATUS   VOLUME                                     CAPACITY   ACCESS MODES   STORAGECLASS    AGE
test-pvc   Bound    pvc-a0215745-258c-4cdb-b248-0da96d8b4a3c   5Gi        RWO            longhorn-fast   9s
root@control01:~# kubectl describe pvc test-pvc
Name:          test-pvc
Namespace:     default
StorageClass:  longhorn-fast
Status:        Bound
Volume:        pvc-a0215745-258c-4cdb-b248-0da96d8b4a3c
Labels:        <none>
Annotations:   pv.kubernetes.io/bind-completed: yes
               pv.kubernetes.io/bound-by-controller: yes
               volume.beta.kubernetes.io/storage-provisioner: driver.longhorn.io
               volume.kubernetes.io/storage-provisioner: driver.longhorn.io
Finalizers:    [kubernetes.io/pvc-protection]
Capacity:      5Gi
Access Modes:  RWO
VolumeMode:    Filesystem
Used By:       <none>
Events:
  Type    Reason                 Age                From                                                                                      Message
  ----    ------                 ----               ----                                                                                      -------
  Normal  Provisioning           40s                driver.longhorn.io_csi-provisioner-869bdc4b79-ml6rw_b9a8fb17-d79e-423f-a3a9-88ec6e5d72fe  External provisioner is provisioning volume for claim "default/test-pvc"
  Normal  ExternalProvisioning   40s (x2 over 40s)  persistentvolume-controller                                                               waiting for a volume to be created, either by external provisioner "driver.longhorn.io" or manually created by system administrator
  Normal  ProvisioningSucceeded  38s                driver.longhorn.io_csi-provisioner-869bdc4b79-ml6rw_b9a8fb17-d79e-423f-a3a9-88ec6e5d72fe  Successfully provisioned volume pvc-a0215745-258c-4cdb-b248-0da96d8b4a3c
Successfully provisioned volume is what you want to see.
To remove the PVC, just delete it.
root@control01:~# kubectl delete pvc test-pvc
persistentvolumeclaim "test-pvc" deleted
That's it. We did huge amount of work here, now take a break. Grab a cup of coffee or tea, maybe help me to one too 😄