Setup
What ?
How to boot Windows and Linux, using uefi net boot and iPXE.
Intro
At home, I have an Unraid server, a beast of a machine, with more cores than Indian have arrows. So I added some virtual machines to it, and later on Nvidia graphic card. This makes the VM as fast as a normal PC and allows me to play games on it. This opened the option to use Parsec for remote gaming.
My idea was to have a network bootable live client that would boot a Live CD of Linux and run Parsec client for me to connect to a VM. I also install/reinstall lots of Linux distros for work. But you could also create live LibreELEC for example and boot up TV box from network. There is lots of potential for network bootable installations or live OSes.
Right out of the bat, the Linux idea was not working with Parsec because it supports only old ass Ubuntu 18 which in turn had issues (not supported) build in Intel UHD600 on my "thin" client. So it would not work with h256 codec. On other hand installing win10 and running Parsec from there it works perfectly.
What we need ?
What we need to get this work ? You might have heart of PXE server for network booting. And well this is what we are going to use. PXE server is nothing really special, it's not one software "PXE" its more of a collection of services that work together.
- A server or VM - I'm going to create a VM with Ubuntu server, version 20.04 LTS on Unraid. This will be our PXE server. (It does not matter if it's a VM, or server... it has to be connected to your network with fixed IP preferably)
- A DHCP server - When we use PXE booting, the NW card will ask your DHCP server for IP and where the TFTP server is. Also, what "ROM" it should load from that TFTP server.
- TFTP server - this is basically a crappy ftp server (no, you can't use FTP server) ancient as PXE itself. Think of it as FTP service, that has no user, and it's open to everybody on your network. This will server the first step of the network boot process, the PXE ROM.
- PXE ROM - This is a tiny bootloader binary that is loaded from TFTP server after NW card gets its IP. It can have menus, some logic, and basically it will reach out and load either kernel or windows PE. In our case we are going to use iPXE. You could use others, grub2 works well for Linux stuff, but I could not get windows to boot. And some others... I can't name any from the top of my head...
- HTTP server - We are going to use Apache2, but you can use virtually anything that is capable to serve files over plain old HTTP. iPXE is cool in a way that it can reach out to a http server and load data from there, so you don't need to host everything over TFTP, which is painfully slow.
- SAMBA server - This is for windows, the Windows boot environment don't know how to mount files over HTTP, so SAMBA is our next option.
- ISOs - Images of Windows, Linux or what ever you are trying to boot up over a network
Drivers - This is related to Windows, the Windows PE (I will talk more about what it is in windows section) does not have many drivers in it. This can cause that it can't mount SAMBA share with install files because no network card recognized... (happened to me and my thin client, so that was not fun to figure out how to fix it. I will show you in windows section)
My exact setup
Since I'm running this on Unraid, part of the guide will depend on SAMBA server. So I will use the SAMBA already running on Unraid. However, if you're following this guide without Unraid, I have included how to set SAMBA on your PXE boot server directly.
Like:
There will be also one Unraid share folder that is mounted inside the VM, but more about that in VM/Server setup.
Unraid VM
I do have one Unriad share called isos and in it there is folder pxe-boot. I will map this folder to the VM and everythig will be stored there.
I have created new VM on unraid, with 2CPU and 2G of RAM (you might get away with 1G). Also mapped the isos share to it like this:

Provide Ubuntu ISO as well into: OS Install ISO
Boot up and install the OS as usual, enable ssh server during install if you want to use ssh client later on.
Regular VM/Server
Just install Ubuntu 20.04 booting from ISO/USB
Network
I'm using VLANs in my netowork, and my VMs are on VLAN30 (IPs in range 10.0.30.x) and my Unriad is in VLAN0 (IPs in range 10.0.0.x). They can "talk" to each other cross VLANs but you should not worry about this much. I'm just explaining it, why there are different IPs ranges. For you just make sure that the IP that you give to your new PXE Ubuntu server is reachable by IPs assigned by your DHCP server.
DHCP
I'm on purpose not going to install new DHCP server since most of you, and me already have one in network. Either standalone, or most likely part of your router. The configuration regarding PXE and your DHCP solution differs a bit between brands so Google is your friend.
For my Unifi USG 3P router its setup per Network so go to Settings -> Networks click on your network name. Then Advance and scroll down to DHCP Network Boot
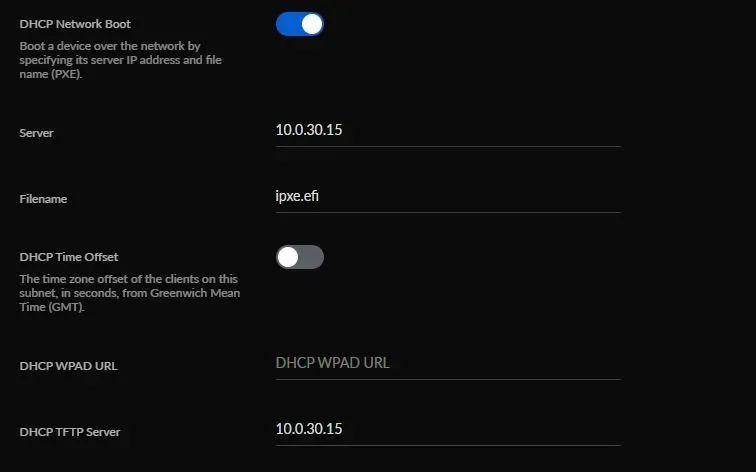
- Server - IP of our PXE server
- Filename - the ROM we will boot (In our case its uefi iPXE, we will add this file to place soon)
- DHCP TFTP Server - IP of our PXE server
Similar setting should be in your DHCP server configuration.
Software services
Log in as root and update your installation with:
apt update
apt upgrade
TFTP server
Our main service. This will server the before mentioned ROM file to the network bootable client.
Install:
apt install -y tftpd-hpaEdit /etc/default/tftpd-hpa to look like this:
TFTP_USERNAME="tftp"
TFTP_DIRECTORY="/pxe-boot"
TFTP_ADDRESS=":69"
TFTP_OPTIONS="--secure"
Regular Server/VM
Create our main folder /pxe-boot Make sure there is enough free space since this folder will house ISOs later on. Put it on separate disk, lvol or what ever, it's up to you.
Unraid
For Unraid users, I'm going to mount Unriad share ISOs (which have pxe-boot folder in it) to this VM.
#Create directory where to mount the share
mkdir /pxe-boot

#Edit /etc/fstab and add
/pxe-boot /pxe-boot 9p trans=virtio,version=9p2000.L,_netdev,rw 0 0

#Mount the share
mount -a
HTTP server
Use what ever you prefer to server HTTP files from /pxe-boot. I'm going with apache2
Install
apt install -y apache2Edit file /etc/apache2/sites-available/000-default.conf, remove everything and add this:
<VirtualHost *:80>
        ServerAdmin some@mail.com
        DocumentRoot /pxe-boot

        ErrorLog ${APACHE_LOG_DIR}/error.log
        CustomLog ${APACHE_LOG_DIR}/access.log combined
</VirtualHost>

<Directory />
        Options +FollowSymLinks +Indexes
        Require all granted
</Directory>
Reload Apache and TFTP
systemctl restart tftpd-hpa
systemctl restart apache2
Check
Now before we move on, check that the following works:
Create test file in /pxe-boot
touch /pxe-boot/test.fileMake sure you can see this file when you go to IP of your PXE server via web browser.
Test TFTP server, ideally from other computer on the network, that you can connect on the PXE server IP and download the test.file. I did this test from a Windows 10 machine running Ubuntu Linux subsystem. One thing to note at that is, Windows 10 firewall will block the TFTP, not the initial connection but the download as that happens on random port not the TFTP port: 69. So I disabled the firewall for a minute and did the following.
vladoportos@Odin:~$ tftp 10.0.30.15
tftp> verbose
Verbose mode on.
tftp> get test.file
getting from 10.0.30.15:test.file to test.file [netascii]
tftp> quit
vladoportos@Odin:~$ ls | grep test.file
test.file
vladoportos@Odin:~$
Samba
We need samba only for windows network installation as far as I know. Because we can boot up to WindowsPE environment, but we need to give it content of the actual windows ISO for installation. So far I have found the only working option to let the WinPE loader mount samba share as disk and install from that.
Unraid
In this case we export directly the iso share in Unriad. Just set the security in SAMBA for this share to Public so there is no password/user
Regular VM/Server
Install SAMBA
apt install -y sambaEdit /etc/samba/smb.conf and at the bottom add:
[pxe-boot]
    comment = Samba on Ubuntu
    path = /pxe-boot
    read only = yes
    browsable = yes
Reload
systemctl restart samba\\10.0.0.2\isos\pxe-boot\... and if you installed it directly on your PXE server than it will be \\<PXE serverIP>\pxe-boot\...We are done with server setup and services, we can now move on to setting the iPXE ROM in next chapter.
All the services are up, take a break and drink.